gRPC on Android using TLS
gRPC is a relatively new concept for the interaction between client and server, but not anymore.

What is Remote Procedure Call (RPC)?
A remote procedure call is a software communication protocol. One process can call a procedure (also known as a function or a sub-routine) on a remote system (e.g. local system) without prior knowledge of the remote system’s network.
RPC uses the traditional Client-Server model. A server defines the procedures, and a client requests the remote servers to apply business logic and return the result.
Rest vs gRPC:
Representational state transfer (REST) is a communication protocol of interaction between a client and server built over HTTP 1.1/HTTPS 1.1 with verbs like (PUT, POST, GET, etc.).
gRPC is a Remote Protocol Call from Google, an open-source, contract-based, cross-platform communication protocol to simplify inter-service communication.
gRPC leverages the bi-directional feature of HTTP/2.0 and TLS. gRPC also enables more efficient communication through serialized binary payloads. It uses a protocol buffer as its mechanism for payload management and serialization, similar to JSON of Rest.
Unlike JSON protocol buffers also include three major parts:
- A contract definition language, i.e. proto3 (latest protocol buffer language specification).
- Generated Function Code
- Language-specific runtime libraries
In contrast to HTTP/1.1, which sequentially loads resources, HTTP/2.0 uses a TCP connection and a single connection to carry many data streams, so there is no resource blocking. In HTTP/1.1 we can face an issue if a resource fails to load the sequence will be blocked.
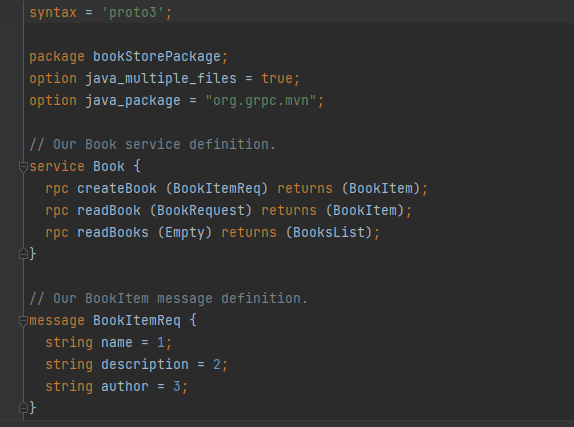
What is proto3?
syntax = 'proto3';

package bookStorePackage;

// Book service definition. defines all the rpc methods here
service Book {
    rpc createBook (BookItemReq) returns (BookItem);
    rpc readBook (BookRequest) returns (BookItem);
    rpc readBooks (Empty) returns (BooksList);
}

// inputs / request , e.g. BookItemReq
// outputs / response BookItem must be defined
// they are defined with a keyword of struct

message BookItemReq {
    string name = 1;
    string description = 2;
    string author = 3;
}

message BookItem {
    int32 id = 1;
    string name = 2;
    string description = 3;
    string author = 4;
}

message BookRequest {
    int32 id = 1;
}

message BooksList {
    repeated BookItem books = 1;
}

message Empty {}
A `.proto` contains the structure of our gRPC and defines the procedures and the request/responses for each call. The .proto files are translated into proto buffer files using the protoc plugin.
protoc --proto_path=src --java_out=build/gen PROTO_PATHLet’s look more into the code now. You can find many resources for a gRPC without TLS implementation. We will look into making a gRPC client in android with TLS.
Some requirements before we start are a secure gRPC server written in any language.
“How To” for Android Studio:
First, we need to set up a new project in android. In this project, we will use an empty activity. Next, set up the dependencies and add the following in build.gradle.
plugins {
id 'com.google.protobuf' version '0.8.18'
}
// this is used to generate proto buf file when you build the project
protobuf {
protoc {
artifact = "com.google.protobuf:protoc:3.21.7"
}
plugins {
grpc {
artifact = 'io.grpc:protoc-gen-grpc-java:1.51.0'
}
}
generateProtoTasks {
all().each { task ->
task.builtins {
java { option 'lite' }
}
task.plugins {
grpc { option 'lite' }
}
}
}
}
dependencies {
// for TLS based connection we need okhttp
implementation 'io.grpc:grpc-okhttp:1.51.1'
implementation 'io.grpc:grpc-protobuf-lite:1.51.1'
implementation 'io.grpc:grpc-stub:1.51.1'
// these are used to set up a secure client
implementation 'com.squareup.okhttp3:okhttp-tls:4.10.0'
implementation 'com.squareup.okhttp3:okhttp:4.10.0'
// for implementation of auto generated code
implementation 'javax.annotation:javax.annotation-api:1.3.2'
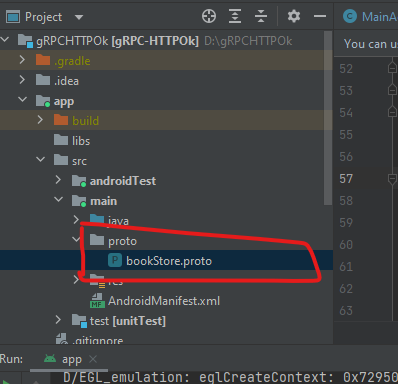
}Now we need to add the proto file to our project.
We need to change the structure from android to project. Now we can add our proto file in app/src/main/proto. We need to create a directory by the name of proto and place our .proto file in there.
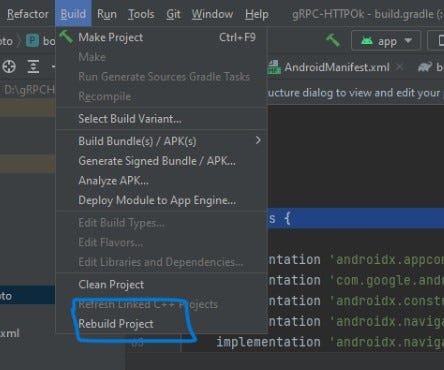
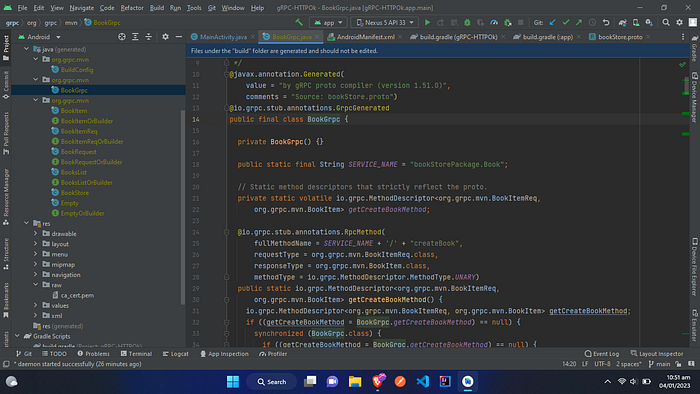
Now we need to build our project from the toolbar > build > rebuild project.
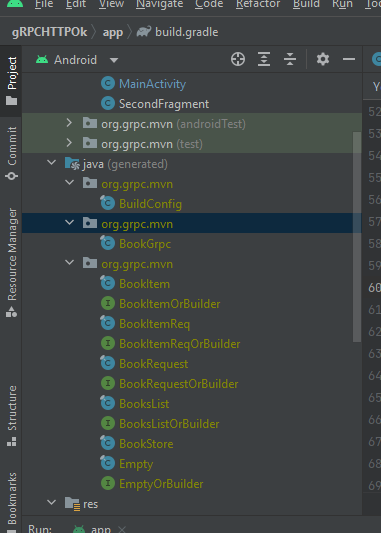
These are the generated file you will get.
One important thing, as we know, in java, we have a specific package name in our project. How do we specify that in our proto file?
It is easy. We need to add an option for java to guide the compiler (protoc) in generating the proto buffer file.
By adding the option in our proto file, our compiler will understand that it needs to specify the package name the one we have enforced. By default, it will use the package keyword as our package name.
Now let’s dig into how to set up our client to communicate with our gRPC server over a secure connection.
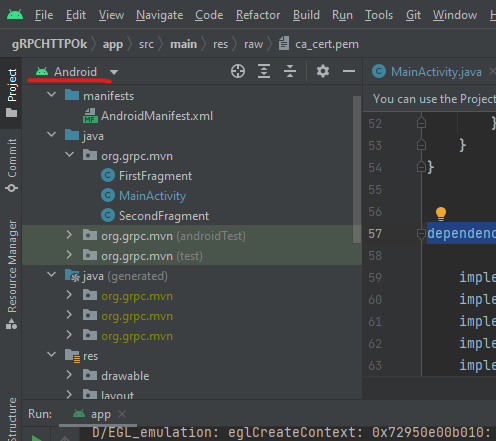
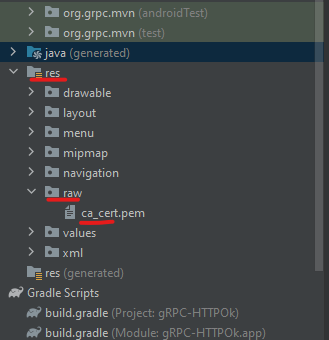
We need to place our signing certificate in the raw category in the res folder of our application.
After we have placed our certificate we need to just use the following piece of code and viola we can easily communicate with our secure server.
        try{
            Resources res = getResources();
            InputStream instream = res.openRawResource(R.raw.ca_cert);
            CertificateFactory cf = CertificateFactory.getInstance("X.509");
            Certificate ca = cf.generateCertificate(instream);
            KeyStore kStore = KeyStore.getInstance(KeyStore.getDefaultType());
            kStore.load(null, null);
            kStore.setCertificateEntry("ca", ca);
            TrustManagerFactory tmf = TrustManagerFactory
                    .getInstance(TrustManagerFactory.getDefaultAlgorithm());
            tmf.init(kStore);
            TrustManager[]  trustManagers = tmf.getTrustManagers();
            if (trustManagers.length != 1 || !(trustManagers[0] instanceof X509TrustManager)) {
                throw new IllegalStateException("Unexpected default trust managers:" + Arrays.toString(trustManagers));
            }
            SSLContext context = SSLContext.getInstance("TLS");
            context.init(null, tmf.getTrustManagers(), null);
            SSLSocketFactory sslSocketFactory = context.getSocketFactory();

            final ManagedChannel channel = OkHttpChannelBuilder
                    .forAddress("IP Address",PORT)
                    .useTransportSecurity()
                    .overrideAuthority("add same DNS / IP:PORT entry here")
                    .sslSocketFactory(sslSocketFactory)
                    .build();
            // BookGrpc is an auto generated class from the proto we defined.
            BookGrpc.BookBlockingStub stub = BookGrpc.newBlockingStub(channel);
            // create a request object
            BookItemReq requestData = BookItemReq
                    .newBuilder()
                    .setName("AnyName")
                    .setAuthor("AnyAuthor")
                    .setDescription("Any Description")
                    .build();
            BookItem response = stub.createBook(requestData);
            // handle the response
            System.out.println(response);
            channel.shutdown();
        } catch (Exception e){
            e.printStackTrace();
        }
Using the provided sample code you can communicate with your secure gRPC server.
What does the code do?
As we know to establish a secure connection, we have a set of certificates that ensure that our communication is encrypted. We need to add a signing certificate to our android application.
Next, we read the certificate using the following lines.
Resources res = getResources();
InputStream instream = res.openRawResource(R.raw.ca_cert);
First, we get the resource instance then we use the function openRawResource to read our certificate. Next, we generate a certificate from our file and add it as a trusted certificate. Using the trusted certificate, we initialize an SSL context instance to initialize an SSL socket factor. SSL socket factory acts as a factor of secure sockets.
An encrypted channel handles requests and responses from the server. We have used an OkHttpChannelBuilder, which supports the use of the SSLSocketFactor to provide a secure communication medium between client and server.
How to obtain certificates yourself?
To generate certificates you can use the following script:
rm *.pem
rm *.srl
rm *.cnf

# 1. Generate CA's private key and self-signed certificate
openssl req -x509 -newkey rsa:4096 -days 365 -nodes -keyout ca-key.pem -out ca-cert.pem -subj "/C=FR/ST=Occitanie/L=Toulouse/O=Test Org/OU=Test/CN=*.test/emailAddress=test@gmail.com"

echo "CA's self-signed certificate"
openssl x509 -in ca-cert.pem -noout -text

# 2. Generate web server's private key and certificate signing request (CSR)
openssl req -newkey rsa:4096 -nodes -keyout server-key.pem -out server-req.pem -subj "/C=FR/ST=Ile de France/L=Paris/O=Server TLS/OU=Server/CN=*.tls/emailAddress=tls@gmail.com"

# Remember that when we develop on localhost, It’s important to add the IP:0.0.0.0 as an Subject Alternative Name (SAN) extension to the certificate.
echo "subjectAltName=DNS:*.tls,DNS:example.com,IP:0.0.0.0" > server-ext.cnf
# Or you can use localhost DNS and grpc.ssl_target_name_override variable
# echo "subjectAltName=DNS:localhost" > server-ext.cnf

# 3. Use CA's private key to sign web server's CSR and get back the signed certificate
openssl x509 -req -in server-req.pem -days 60 -CA ca-cert.pem -CAkey ca-key.pem -CAcreateserial -out server-cert.pem -extfile server-ext.cnf

echo "Server's signed certificate"
openssl x509 -in server-cert.pem -noout -text

# 4. Generate client's private key and certificate signing request (CSR)
openssl req -newkey rsa:4096 -nodes -keyout client-key.pem -out client-req.pem -subj "/C=FR/ST=Alsace/L=Strasbourg/O=PC Client/OU=Computer/CN=*.client.com/emailAddress=client@gmail.com"

# Remember that when we develop on localhost, It’s important to add the IP:0.0.0.0 as an Subject Alternative Name (SAN) extension to the certificate.
echo "subjectAltName=DNS:eaple.com,IP:0.0.0.0" > client-ext.cnf

# 5. Use CA's private key to sign client's CSR and get back the signed certificate
openssl x509 -req -in client-req.pem -days 60 -CA ca-cert.pem -CAkey ca-key.pem -CAcreateserial -out client-cert.pem -extfile client-ext.cnf

echo "Client's signed certificate"
openssl x509 -in client-cert.pem -noout -text
Note: You can find the complete code at https://github.com/AbdullahJanKhan/android-grpc-tls
